PyQt By Example (Session 4)
PyQt By Example: Session 4
Action!
Requirements
If you have not done it yet, please check the previous sessions:
All files for this session are here: Session 4 at GitHub. You can use them, or you can follow these instructions starting with the files from Session 3 and see how well you worked!
Action!
What's an Action?
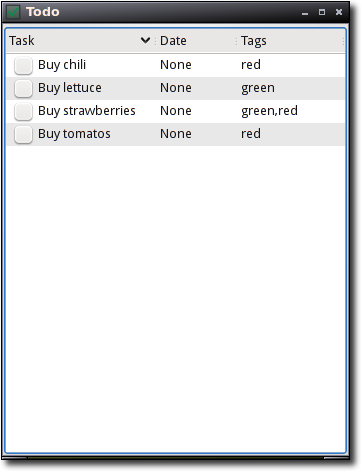
When we finished session 3 we had a basic todo application, with very limited functionality: you can mark tasks as done, but you can't edit them, you can't create new ones, and you can't remove them, much less do things like filtering them.

A very limited application
Today we will start writing code and designing UI to do those things.
The key concept here is Actions.
Help? That's an action
Open File? That's an action
Cut / Copy / Paste? Those are actions too.
Let's quote The Fine Manual:
The QAction class provides an abstract user interface action that can be inserted into widgets.
In applications many common commands can be invoked via menus, tool bar buttons, and keyboard shortcuts. Since the user expects each command to be performed in the same way, regardless of the user interface used, it is useful to represent each command as an action.
Actions can be added to menus and tool bars, and will automatically keep them in sync. For example, in a word processor, if the user presses a Bold tool bar button, the Bold menu item will automatically be checked.
A QAction may contain an icon, menu text, a shortcut, status text, "What's This?" text, and a tooltip.
The beauty of actions is that you don't have to code things twice. Why add a "Copy" button to a tool bar, then a "Copy" menu entry, then write two handlers?
Create actions for everything the user can do then plug them in your UI in the right places. If you put them in a menu, it's a menu entry. If you put it in a tool bar, it's a button. Then write a handler for the action, connect it to the right signal, and you are done.
Let's start with a simple action: Remove Task. We will be doing the first half of the job, creating the action itself and the UI, using designer.
Creating Actions in Designer
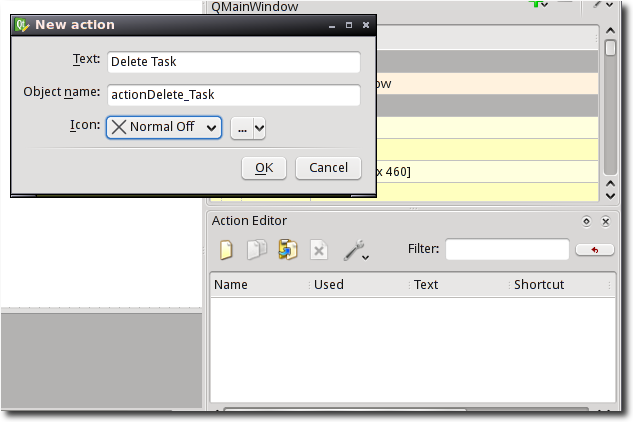
First, let's go to the Action Editor and obviously click on the "New Action" button and start creating it:

Creating a New Action
A few remarks:
If you don't know where the "X" icon came from, you have not read session 3 ;-)
The
actionDelete_Taskobject name is automatically generated from the text field. In some cases that can lead to awful names. If that's the case, you can just change the object name.The same text is used for the iconText and toolTip properties. If that's not correct, you can change it later.
Once you create the action, it will not be marked as "Used" in the action editor. That's because it exists, but has not been made available to the user anywhere in the window we are creating.
There are two obvious places for this action: a tool bar, and a menu bar.
Adding Actions to a Tool Bar
To add an action to a tool bar, first make sure there is one. If you don't have one in your "Object Inspector", then right click on MainWindow (either the actual window, or its entry in the inspector), and choose "Add Tool Bar".
You can add as many tool bars as you want, but try to want only one, unless you have a very good reason (we will have one in session 5 ;-)
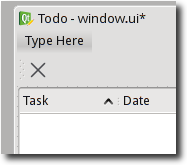
After you create the tool bar, you will see empty space between the menu bar (that says "Type Here") and the task list widget. That space is the tool bar.
Drag your action's icon from the action editor to the tool bar.
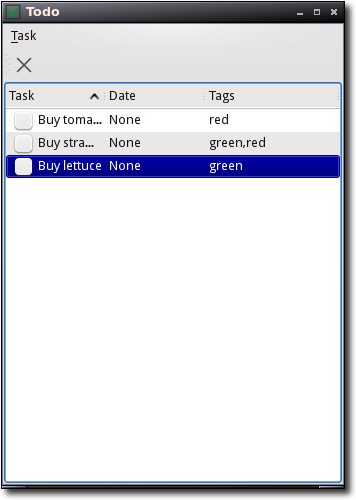
That's it!

The Delete Task action is now in the tool bar.
Coming Soon
Well, that was a rather long explanation for a small feature, wasn't it? Don't worry, the next actions will be much easier to add, because I expect you to read "I added an action called New Task" and know what I am talking about.
And in the next session, we will do just that. And we will create our first dialog.
Further Reading
Here you can see what changed between the old and new versions:
|
Generated by diff2html © Yves Bailly, MandrakeSoft S.A. 2001 diff2html is licensed under the GNU GPL. |
| session3/main.py | session4/main.py | |||
|---|---|---|---|---|
|
60 lines 1557 bytes Last modified : Thu Mar 5 02:03:34 2009 |
79 lines 2300 bytes Last modified : Sat Mar 7 02:06:29 2009 |
|||
| 1 | # -*- coding: utf-8 -*- | 1 | # -*- coding: utf-8 -*- | |
| 2 | 2 | |||
| 3 | """The user interface for our app""" | 3 | """The user interface for our app""" | |
| 4 | 4 | |||
| 5 | import os,sys | 5 | import os,sys | |
| 6 | 6 | |||
| 7 | # Import Qt modules | 7 | # Import Qt modules | |
| 8 | from PyQt4 import QtCore,QtGui | 8 | from PyQt4 import QtCore,QtGui | |
| 9 | 9 | |||
| 10 | # Import the compiled UI module | 10 | # Import the compiled UI module | |
| 11 | from windowUi import Ui_MainWindow | 11 | from windowUi import Ui_MainWindow | |
| 12 | 12 | |||
| 13 | # Import our backend | 13 | # Import our backend | |
| 14 | import todo | 14 | import todo | |
| 15 | 15 | |||
| 16 | # Create a class for our main window | 16 | # Create a class for our main window | |
| 17 | class Main(QtGui.QMainWindow): | 17 | class Main(QtGui.QMainWindow): | |
| 18 | def __init__(self): | 18 | def __init__(self): | |
| 19 | QtGui.QMainWindow.__init__(self) | 19 | QtGui.QMainWindow.__init__(self) | |
| 20 | 20 | |||
| 21 | # This is always the same | 21 | # This is always the same | |
| 22 | self.ui=Ui_MainWindow() | 22 | self.ui=Ui_MainWindow() | |
| 23 | self.ui.setupUi(self) | 23 | self.ui.setupUi(self) | |
| 24 | 24 | |||
| 25 | # Let's do something interesting: load the database contents | 25 | # Let's do something interesting: load the database contents | |
| 26 | # into our task list widget | 26 | # into our task list widget | |
| 27 | for task in todo.Task.query().all(): | 27 | for task in todo.Task.query().all(): | |
| 28 | tags=','.join([t.name for t in task.tags]) | 28 | tags=','.join([t.name for t in task.tags]) | |
| 29 | item=QtGui.QTreeWidgetItem([task.text,str(task.date),tags]) | 29 | item=QtGui.QTreeWidgetItem([task.text,str(task.date),tags]) | |
| 30 | item.task=task | 30 | item.task=task | |
| 31 | if task.done: | 31 | if task.done: | |
| 32 | item.setCheckState(0,QtCore.Qt.Checked) | 32 | item.setCheckState(0,QtCore.Qt.Checked) | |
| 33 | else: | 33 | else: | |
| 34 | item.setCheckState(0,QtCore.Qt.Unchecked) | 34 | item.setCheckState(0,QtCore.Qt.Unchecked) | |
| 35 | self.ui.list.addTopLevelItem(item) | 35 | self.ui.list.addTopLevelItem(item) | |
| 36 | 36 | |||
| 37 | def on_list_itemChanged(self,item,column): | 37 | def on_list_itemChanged(self,item,column): | |
| 38 | if item.checkState(0): | 38 | if item.checkState(0): | |
| 39 | item.task.done=True | 39 | item.task.done=True | |
| 40 | else: | 40 | else: | |
| 41 | item.task.done=False | 41 | item.task.done=False | |
| 42 | todo.saveData() | 42 | todo.saveData() | |
| 43 | 43 | |||
| 44 | def on_actionDelete_Task_triggered(self,checked=None): | |||
| 45 | if checked is None: return | |||
| 46 | # First see what task is "current". | |||
| 47 | item=self.ui.list.currentItem() | |||
| 48 | ||||
| 49 | if not item: # None selected, so we don't know what to delete! | |||
| 50 | return | |||
| 51 | # Actually delete the task | |||
| 52 | item.task.delete() | |||
| 53 | todo.saveData() | |||
| 54 | ||||
| 55 | # And remove the item. I think that's not pretty. Is it the only way? | |||
| 56 | self.ui.list.takeTopLevelItem(self.ui.list.indexOfTopLevelItem(item)) | |||
| 57 | ||||
| 58 | def on_list_currentItemChanged(self,current=None,previous=None): | |||
| 59 | if current: | |||
| 60 | self.ui.actionDelete_Task.setEnabled(True) | |||
| 61 | else: | |||
| 62 | self.ui.actionDelete_Task.setEnabled(False) | |||
| 44 | 63 | |||
| 45 | def main(): | 64 | def main(): | |
| 46 | # Init the database before doing anything else | 65 | # Init the database before doing anything else | |
| 47 | todo.initDB() | 66 | todo.initDB() | |
| 48 | 67 | |||
| 49 | # Again, this is boilerplate, it's going to be the same on | 68 | # Again, this is boilerplate, it's going to be the same on | |
| 50 | # almost every app you write | 69 | # almost every app you write | |
| 51 | app = QtGui.QApplication(sys.argv) | 70 | app = QtGui.QApplication(sys.argv) | |
| 52 | window=Main() | 71 | window=Main() | |
| 53 | window.show() | 72 | window.show() | |
| 54 | # It's exec_ because exec is a reserved word in Python | 73 | # It's exec_ because exec is a reserved word in Python | |
| 55 | sys.exit(app.exec_()) | 74 | sys.exit(app.exec_()) | |
| 56 | 75 | |||
| 57 | 76 | |||
| 58 | if __name__ == "__main__": | 77 | if __name__ == "__main__": | |
| 59 | main() | 78 | main() | |
| 60 | 79 |
Generated by diff2html on Sat Mar 7 02:08:22 2009
Command-line: /home/ralsina/bin/diff2html session3/main.py session4/main.py


In order to avoid the "Delete Task" to be enabled at first launch you should put:
self.ui.list.setCurrentItem(None)
next to line 35.
By the way this tutorial is usefull! Thanks mate.
Yes, that's the other way to do it.
I prefer to keep initial behaviour in designer if I can.
It's not another way. Only setting "disable" for the action in designer doesn't works for me.
You are right. It should work, though, so I will take a look at why it doesn't.
apparently, on_list_currentItemChanged is being called, even though I don't see an item being selected, that's why it gets enabled.
Adding a disable() call simply hides the problem.
I will take a better look later today.
How would one go about and intercept/overload/autoconnect the top right x-button so cleanup could be done gracefully?
You can use QtCore.pyqtSlot decorator to avoid your slots get called twice:
file:///usr/share/doc/pyqt4/doc/pyqt4ref.html#connecting-slots-by-name
Another way to avoid the issue you highlight in the "An Important Issue" box is to add explicit decorations as suggested
at the end of the docs you refer to:
@QtCore.pyqtSlot('bool')
def on_actionDelete_Task_triggered(self, checked):
print "adtt",checked
Hi very nice article
Your blog has the same post as another author but i like your better
Thank you for this beautiful tutorial! It is simple, informative, easy to follow and VERY well presented. I found it while searching to find an answer for the multiple signals issue, so I thought I would post the "proper" way to eliminate it and offer credit for steering me to the solution as well. The proper way to handle this problem is to place @QtCore.pyqtSignature("") before *every* event handler that you don't want both signals sent to. This can be found in the document referenced in your sidebar as involved". Read section 3.7of the PyQt v4 Bindings Reference Guide once you've clicked the link!
Thanks again!!
Best PyQt tutorial ever!
Note: I'm following it using PySide instead and it's been working well so far. It's just a matter of adjusting the imports and calling the equivalent tools in the command line. Check: http://qt-project.org/wiki/... for more information.