PyQt By Example (Session 5)
PyQt By Example: Session 5
Dialog
Requirements
If you have not done it yet, please check the previous sessions:
All files for this session are here: Session 5 at GitHub. You can use them, or you can follow these instructions starting with the files from Session 4 and see how well you worked!
Dialog
When we finished session 4 we had a TODO application that was able of displaying your task list, and deleting a task, and had the proper UI for that.
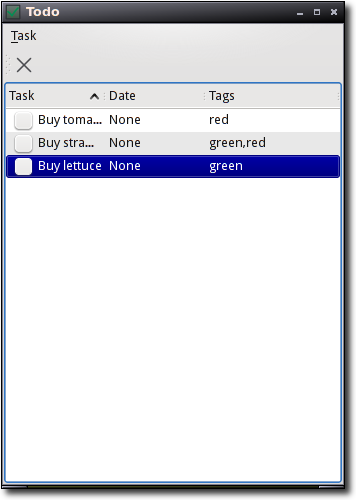
A very limited application
The obvious missing pieces are creating and modifying tasks, and that's what we will be implementing today. This is a longer session, because we will do a lot of work.
But first, let's consider a course of action, because there are several different ways to do this, and trying to implement something you have not thought about sucks.
Inline Editing
When the user clicks (or double-clicks?) on a task, he could start editing the task properties in the task item itself.
Examples of this model of interaction include:
Spreadsheets
File renaming in some file managers
Todo lists in some websites
The good:
Minimal user interface.
Obvious if the user knows about it.
Direct manipulation of the task item is a good metaphor.
Works well in small screens (netbooks, phones)
The bad:
It's not trivial to implement, for example, a due date/time editor this way (feel free to prove me wrong ;-)
I don't like it much for task addition. Using this paradigm usually means you create a task using placeholders like "New Task" and then need to edit it. I prefer if the user creates the tasks "fully fledged".
So, maybe it's a good idea to implement this, but I am fully convinced.
Editor Dialog
When the user triggers the "edit task" action, a dialog pops up where he can set the task's properties.
Examples of this model of interaction:
File properties in most file managers.
Configuration dialogs in most applications.
The good:
A separate dialog allows use of a richer UI, because you are not limited by the small space used for inline editing.
The same dialog can be used for task creating with minimal changes.
It would let me show you how to create a proper dialog ;-)
The bad:
Breaks the metaphor. Only do that when it makes sense
Popup dialogs often obscure the main window. Then if you need to check a date from another task, you need to move the dialog aside.
Old fashioned?
All in all, not a fan of this option as the main mechanism for task editing.
Sliding Panels
This is a more modern interaction model: when a task editing action is triggered, a gadget slides into view from one of the window edges, containing the editing widgets.
Examples of this interaction:
Firefox's search dialog (Thankfully many apps are using this now, popup search dialogs suck)
Boxee's menu
Some phone interfaces
The good:
Rich UI like in a dialog
No popups (Modern?)
Works for adding tasks as well.
The bad:
Could be confusing?
Could not work great in small screens (needs testing!)
In my screen the widget is only 300px tall, so it should fit even a small form factor screen (A 800x480 netbook?, a QVGA phone?) nicely, although in those cases it will obscure the window app completely. In such small screens "paginated" interfaces are a good idea.
If the main window's form factor is small (as it is for this app), a large panel will obscure most or all the window.
I think I like this option best, but I am not exactly overcome with enthusiasm. It should also work well as a teaching aid, since we will need to learn to do many things to make it work correctly!
Anyway: if you prefer another approach for this task, you can probably reuse some of the code, and I will be happy to present your alternative implementations here, so go ahead and code them!
Creating the Form
As usual when we do UI work, we start with designer. This time, we will not create a Main Window, but a Widget, and laying out the necessary widgetry. Just put them roughly where you think they should go, here is how I started:
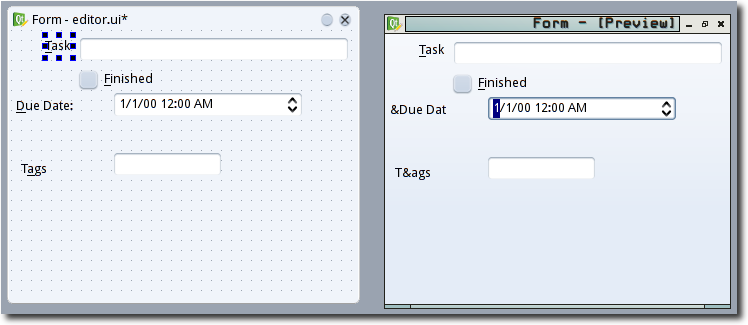
Just a draft
What we are creating here is a classical two-column form: labels on the left, widgets on the right. Almost every program has one of these!
The main goals are (in no particular order):
It should react nicely to resizing.
It should not look weird. On any platform, if you can do it.
The purpose of each thing in the screen should be obvious.
It should be usable by keyboard and mouse.
And here's some steps towards those goals:
Layouts
You can think of this form as a a 2x3 grid. Group things that go in a single cell using a layout. In our case, we don't have a multi-widget cell.
-
Select the contents of each "cell" and put them in a form layout.
There are other ways to do this, like using a grid layout. Use a form layout instead, because it will look correct (or at least more correct) on other platforms which have rules like "align the labels left" or "align the labels right".
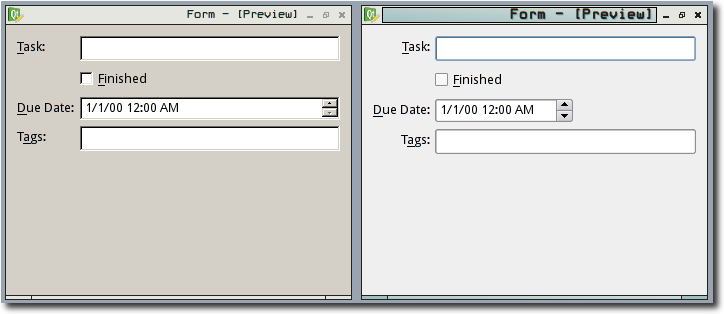
No form layout is always right...
Right-click on the background and lay out the contents of the widget vertically.
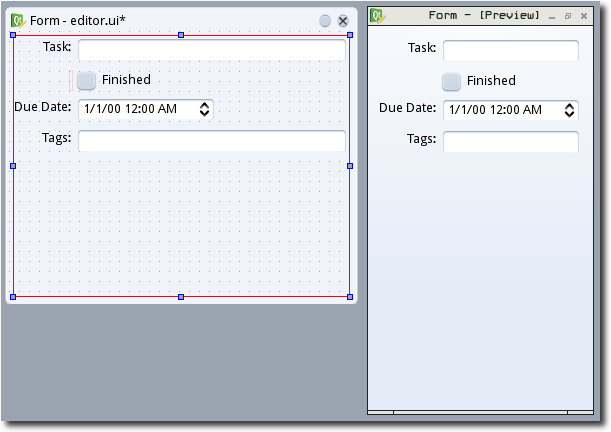
You can see the layouts outlined in red.
Keyboard Handling
-
Configure buddies. This associates a label to a widget. It's very important, because then you can do the next item ;-)
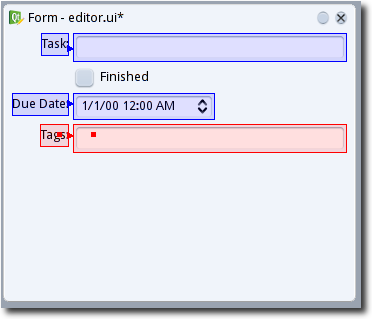
Buddies.
-
Add shortcuts to the labels. If you change "Due Date" for "&Due Date", the "D" will be underlined and Alt-D will jump to the date editor. If a label is not a buddy for a widget, this does not work!
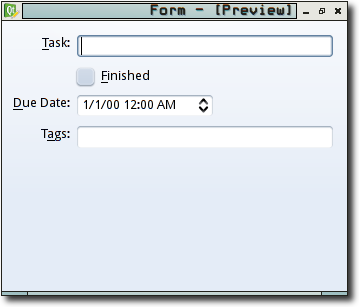
Shortcuts.
-
Tab order. Usually, you want the tab order to just be the top-to-bottom order of your widgets. That is usually the least surprising option.
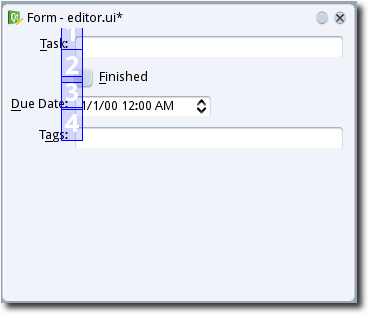
Tab order.
Miscelaneous
Some chores:
Change the object names for the important widgets (that is, not for the labels).
Tweak attributes (if you have a good reason!)
Test it in different styles, see if aything bad happens
Rename
Add compiling editor.ui to our build.sh
Let's consider our task editing/creating widget done. Now, we need to integrate it in our main window.
Working on the Main Window
Actions
The user interaction is done via actions. We want to enable the user to:
Create a new task: action "actionNew_Task".
Modify an existing task: action "actionEdit_Task".
For details on why and how to do this, check session 4, but some UI notes: I placed a separator in the Task menu before "Delete Task" to give it some space, since it's a destructive action. Same thing in the tool bar.
Editor Widget
Since the logic form factor for our app's window is "tall and skinny", it makes sense that the editor will slide in from the bottom.
We will use our editor widget as a "promoted widget" in the main window. That means we do all our designer work using a plain widget as a stand-in and tell designer that it should "promote" it to the real thing later.
If you create a widget that can be reused by others, it's probably a better idea to make it work as a custom widget instead, but for us that will not be necessary.
First, we need to create a class that inherits QWidget, which will be our task editor widget.
The simplest version of such a class would look like this (suppose this is in a file called editor.py):
How can we use it in designer?
Right-click the task list and break its layout.
Leave some room below the task list, and put a QWidget there.
Select the task list and the placeholder and lay them out in a vertical splitter (it's in the tool bar)
-
Right-click on the form's background and lay it out vertically.
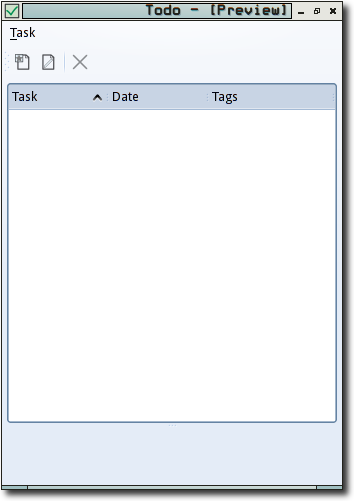
A placeholder in place.
-
Right click on the placeholder and select "Promote to..."
Base class: QWidget
Promoted class name: editor
Header file: editor
Click "Add"
Click "Promote"
You will not notice any changes. But if you recompile the window and try running
python main.pyyou will see this: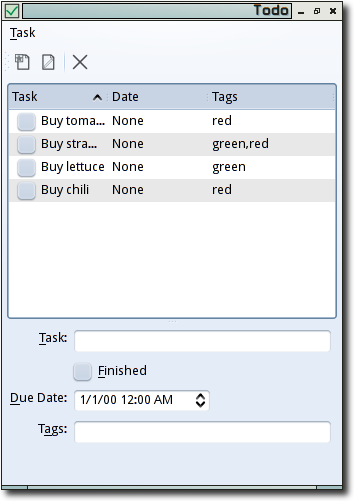
Yes, the editor is there
Cool, isn't it? It's not difficult to reuse these widget aggregates in other applications, or in different contexts in the same app, for example, if I later decide to create a editor dialog I can just reuse this widget for both places.
However, this is not how we want our app to appear when first started! We only want the editor to be visible when the user is actually editing a task.
There are several ways to achieve this, but let's go with the simplest one, hide the editor in Main.__init__:
Adding a New Task
Since we now have a task editing widget, we can start using it! First, let's use it to add new tasks.
As seen in session 2 in order to react to the "actionAdd_Task" we ned to implement Main.on_actionNew_Task_triggered:
What this code is doing should be almost obvious. If you don't get it, check the explanation of Main.__init__ and todo.py in session 1. The non-obvious is the call to editor.edit(item). What's that?
Since the goal of the task editor widget is editing tasks, it needs to know what task to edit, and it needs to be able to save the modifications.
I will implement this using "instant apply", which means there is no save button, no apply button and no ok button. You changed the tags? Well, then the tags are changed ;-)
Here's the full code for the editor widget:
As you can see, there is a save() method, but we are not calling it anywhere. That's because we will use signals and slots to invoke it.
Open editor.ui in designer and right-click on the Form QWidget. Then, select "Change signals/slots...", you will see this dialog. I have added the "save()" slot.
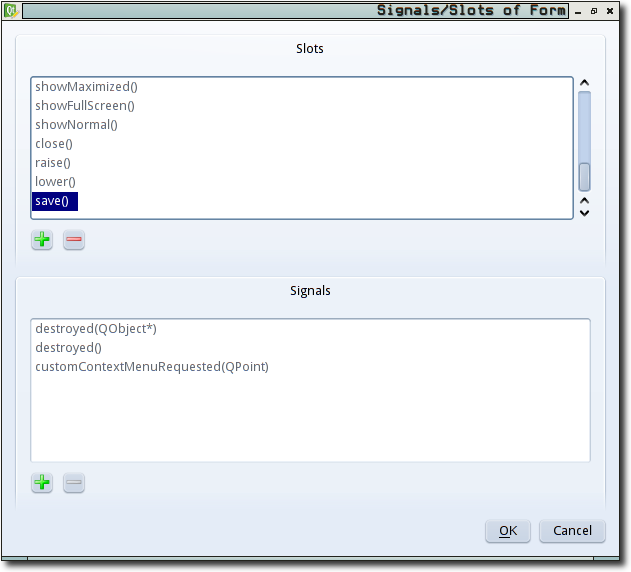
The custom save() slot.
I did this so I can connect signals to my save() method using designer. So, let's connect every signal marking a change in the content of the dialog to this save() slot:

Signals connected to save()
And then, just like that, it works:
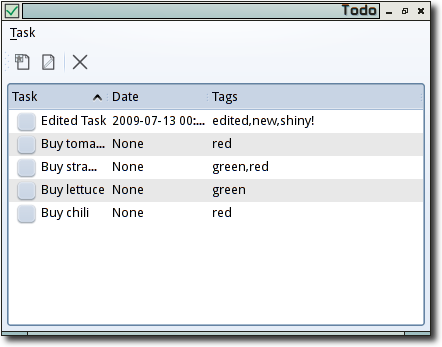
It's alive! ALIVE!!!!!
Editing Tasks
This will be anticlimactic:
Coming Soon
This was our longest session yet, and what have we achieved? No longer is our app useless. It does, in fact, kinda work. However, it is buggy as hell. In the next session I will walk you through some informal interface testing which will show where the defects live, and we will fix a lot of them.
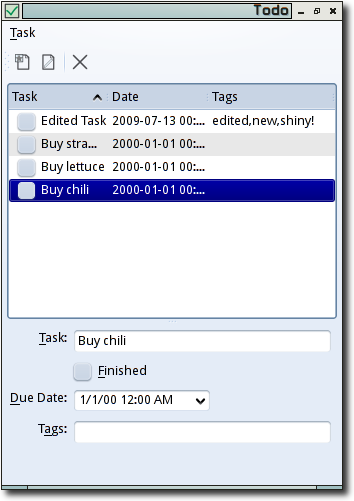
Here you can see what changed between the old and new versions:
|
Generated by diff2html © Yves Bailly, MandrakeSoft S.A. 2001 diff2html is licensed under the GNU GPL. |
| session4/main.py | session5/main.py | |||
|---|---|---|---|---|
|
79 lines 2300 bytes Last modified : Sat Mar 7 02:06:29 2009 |
122 lines 3788 bytes Last modified : Sun Mar 15 22:01:04 2009 |
|||
| 1 | # -*- coding: utf-8 -*- | 1 | # -*- coding: utf-8 -*- | |
| 2 | 2 | |||
| 3 | """The user interface for our app""" | 3 | """The user interface for our app""" | |
| 4 | 4 | |||
| 5 | import os,sys | 5 | import os,sys | |
| 6 | 6 | |||
| 7 | # Import Qt modules | 7 | # Import Qt modules | |
| 8 | from PyQt4 import QtCore,QtGui | 8 | from PyQt4 import QtCore,QtGui | |
| 9 | 9 | |||
| 10 | # Import the compiled UI module | 10 | # Import the compiled UI module | |
| 11 | from windowUi import Ui_MainWindow | 11 | from windowUi import Ui_MainWindow | |
| 12 | 12 | |||
| 13 | # Import our backend | 13 | # Import our backend | |
| 14 | import todo | 14 | import todo | |
| 15 | 15 | |||
| 16 | # Create a class for our main window | 16 | # Create a class for our main window | |
| 17 | class Main(QtGui.QMainWindow): | 17 | class Main(QtGui.QMainWindow): | |
| 18 | def __init__(self): | 18 | def __init__(self): | |
| 19 | QtGui.QMainWindow.__init__(self) | 19 | QtGui.QMainWindow.__init__(self) | |
| 20 | 20 | |||
| 21 | # This is always the same | 21 | # This is always the same | |
| 22 | self.ui=Ui_MainWindow() | 22 | self.ui=Ui_MainWindow() | |
| 23 | self.ui.setupUi(self) | 23 | self.ui.setupUi(self) | |
| 24 | 24 | |||
| 25 | # Start with the editor hidden | |||
| 26 | self.ui.editor.hide() | |||
| 27 | ||||
| 25 | # Let's do something interesting: load the database contents | 28 | # Let's do something interesting: load the database contents | |
| 26 | # into our task list widget | 29 | # into our task list widget | |
| 27 | for task in todo.Task.query().all(): | 30 | for task in todo.Task.query().all(): | |
| 28 | tags=','.join([t.name for t in task.tags]) | 31 | tags=','.join([t.name for t in task.tags]) | |
| 29 | item=QtGui.QTreeWidgetItem([task.text,str(task.date),tags]) | 32 | item=QtGui.QTreeWidgetItem([task.text,str(task.date),tags]) | |
| 30 | item.task=task | 33 | item.task=task | |
| 31 | if task.done: | 34 | if task.done: | |
| 32 | item.setCheckState(0,QtCore.Qt.Checked) | 35 | item.setCheckState(0,QtCore.Qt.Checked) | |
| 33 | else: | 36 | else: | |
| 34 | item.setCheckState(0,QtCore.Qt.Unchecked) | 37 | item.setCheckState(0,QtCore.Qt.Unchecked) | |
| 35 | self.ui.list.addTopLevelItem(item) | 38 | self.ui.list.addTopLevelItem(item) | |
| 36 | 39 | |||
| 37 | def on_list_itemChanged(self,item,column): | 40 | def on_list_itemChanged(self,item,column): | |
| 38 | if item.checkState(0): | 41 | if item.checkState(0): | |
| 39 | item.task.done=True | 42 | item.task.done=True | |
| 40 | else: | 43 | else: | |
| 41 | item.task.done=False | 44 | item.task.done=False | |
| 42 | todo.saveData() | 45 | todo.saveData() | |
| 43 | 46 | |||
| 44 | def on_actionDelete_Task_triggered(self,checked=None): | 47 | def on_actionDelete_Task_triggered(self,checked=None): | |
| 45 | if checked is None: return | 48 | if checked is None: return | |
| 46 | # First see what task is "current". | 49 | # First see what task is "current". | |
| 47 | item=self.ui.list.currentItem() | 50 | item=self.ui.list.currentItem() | |
| 48 | 51 | |||
| 49 | if not item: # None selected, so we don't know what to delete! | 52 | if not item: # None selected, so we don't know what to delete! | |
| 50 | return | 53 | return | |
| 51 | # Actually delete the task | 54 | # Actually delete the task | |
| 52 | item.task.delete() | 55 | item.task.delete() | |
| 53 | todo.saveData() | 56 | todo.saveData() | |
| 54 | 57 | |||
| 55 | # And remove the item. I think that's not pretty. Is it the only way? | 58 | # And remove the item. I think that's not pretty. Is it the only way? | |
| 56 | self.ui.list.takeTopLevelItem(self.ui.list.indexOfTopLevelItem(item)) | 59 | self.ui.list.takeTopLevelItem(self.ui.list.indexOfTopLevelItem(item)) | |
| 57 | 60 | |||
| 58 | def on_list_currentItemChanged(self,current=None,previous=None): | 61 | def on_list_currentItemChanged(self,current=None,previous=None): | |
| 62 | # In Session 5, fixes a bug where an item was current but had no visible | |||
| 63 | # changes, so it could be deleted/edited surprisingly. | |||
| 59 | if current: | 64 | if current: | |
| 60 | self.ui.actionDelete_Task.setEnabled(True) | 65 | current.setSelected(True) | |
| 61 | else: | 66 | ||
| 62 | self.ui.actionDelete_Task.setEnabled(False) | 67 | # Changed in session 5, because we have more than one action | |
| 68 | # that should only be enabled only if a task is selected | |||
| 69 | for action in [self.ui.actionDelete_Task, | |||
| 70 | self.ui.actionEdit_Task, | |||
| 71 | ]: | |||
| 72 | if current: | |||
| 73 | action.setEnabled(True) | |||
| 74 | else: | |||
| 75 | action.setEnabled(False) | |||
| 76 | ||||
| 77 | def on_actionNew_Task_triggered(self,checked=None): | |||
| 78 | if checked is None: return | |||
| 79 | # Create a dummy task | |||
| 80 | task=todo.Task(text="New Task") | |||
| 81 | ||||
| 82 | # Create an item reflecting the task | |||
| 83 | item=QtGui.QTreeWidgetItem([task.text,str(task.date),""]) | |||
| 84 | item.setCheckState(0,QtCore.Qt.Unchecked) | |||
| 85 | item.task=task | |||
| 86 | ||||
| 87 | # Put the item in the task list | |||
| 88 | self.ui.list.addTopLevelItem(item) | |||
| 89 | self.ui.list.setCurrentItem(item) | |||
| 90 | # Save it in the DB | |||
| 91 | todo.saveData() | |||
| 92 | # Open it with the editor | |||
| 93 | self.ui.editor.edit(item) | |||
| 94 | ||||
| 95 | def on_actionEdit_Task_triggered(self,checked=None): | |||
| 96 | if checked is None: return | |||
| 97 | ||||
| 98 | # First see what task is "current". | |||
| 99 | item=self.ui.list.currentItem() | |||
| 100 | ||||
| 101 | if not item: # None selected, so we don't know what to edit! | |||
| 102 | return | |||
| 103 | ||||
| 104 | # Open it with the editor | |||
| 105 | self.ui.editor.edit(item) | |||
| 63 | 106 | |||
| 64 | def main(): | 107 | def main(): | |
| 65 | # Init the database before doing anything else | 108 | # Init the database before doing anything else | |
| 66 | todo.initDB() | 109 | todo.initDB() | |
| 67 | 110 | |||
| 68 | # Again, this is boilerplate, it's going to be the same on | 111 | # Again, this is boilerplate, it's going to be the same on | |
| 69 | # almost every app you write | 112 | # almost every app you write | |
| 70 | app = QtGui.QApplication(sys.argv) | 113 | app = QtGui.QApplication(sys.argv) | |
| 71 | window=Main() | 114 | window=Main() | |
| 72 | window.show() | 115 | window.show() | |
| 73 | # It's exec_ because exec is a reserved word in Python | 116 | # It's exec_ because exec is a reserved word in Python | |
| 74 | sys.exit(app.exec_()) | 117 | sys.exit(app.exec_()) | |
| 75 | 118 | |||
| 76 | 119 | |||
| 77 | if __name__ == "__main__": | 120 | if __name__ == "__main__": | |
| 78 | main() | 121 | main() | |
| 79 | 122 |
Generated by diff2html on Sun Mar 15 22:01:22 2009
Command-line: /home/ralsina/bin/diff2html session4/main.py session5/main.py
Not to sound too whiney, but I'm turning really purple here holding my breath for the next session.
In the last month I have had 60 hour work weeks.
Someone has to pay for my free time to write these things, and it turned out to be me, so it's taking a little longer than expected ;-)
Testet on Karmic (Python 2.6.4 - Qt 4.5.2 - PyQt 4.6) with acual (2009-11-08) - EasyInstall of Elixir-0.7.0-py2.6.egg
I got an attribute-Error with query() Line ~ 27 - 30 in the main.py-scripts of session 2 - 5:
for task in todo.Task.query().all():
It worked fine without the '()' behind todo.Task.query ... so I had to write:
for task in todo.Task.query.all(): ...
@guest I'll take a look and see if it needs updating for Elixir 0.7
Hi very nice article
Your blog has the same post as another author but i like your better
Roberto, thank you so much for these tutorials. They are out of this world! Wonderful detail, and very helpful explanation.
Thank you very much for a delightful series introducing me to the wonderful world of PyQt, I don't know what I'd have done without it, just finished this last session, having added in only a few minor modifications of that which you gave.
Do you think you'll write the next part of the guide? Curiosity entices me to know how you'd go about solving the very obvious bugs (and perhaps also a few I've missed). I hope the 60 hour weeks have subsided, so not good.
Oh, one more thing, I noticed that the line numbers on the code pastings always started at 1, even if you were inserting code part way in.
nooo, porqué terminó así! queremos aprender más cosas sobre PyQt, qué hiciste en esas 108 horas restantes! jajaj, en serio, muchísimas gracias por este tutorial, realmente muy bien explicado, incluso también por los enlaces que ibas haciendo en cada uno que estaban muy interesantes. Hasta ahora lo que había encontrado no me había sido de mucha ayuda, había ejemplos que apenas creaban una ventana o la demasiado extensa, y difícil de comprender para empezar, documentación encima en inglés. Gracias de nuevo, me agendo tu blog, y espero que en algún momento puedas continuar esta serie.