Safe Remote Blogging with PyDS
Introduction
The software I use to build this blog, Python Desktop Server (PyDS) is accessed through HTTP. To use the web interface to post stories or messages, I point my web browser to http://127.0.0.1:4334 and start typing. Obviously, such a URL only works when I am sitting on the specific computer where PyDS is installed, because 127.0.0.1 is the "local adddress". It always points to your own box.
If I wanted to work on my blog from another computer, I would have to use a URL like http://192.168.1.253:4334, where 192.168.1.253 is the IP address for my computer. However, that won't work, because PyDS only listens for connections on the 127.0.0.1 address.
The goal here is to be able to blog at will from anywhere. Since there are several ways to do it, and the difficulty and convenience of each varies, I will split it in three scenarios, in increasing order of difficulty and security.
Scenario Number 1
The network I want to use for blogging is trusted. For example, my home network, behind a firewall, and I live alone. Since noone else can access anything, not even a password protection for the blog is necessary.
Edit ~/.PyDS/etc/PyDSConfig.py (if it doesn't exist, create it) to have something like this:
serverip="0.0.0.0"
While this is easy, it's also very insecure. You can now point your browser to your public IP address, port 4334, and blog at will.
Remember that, because PyDS doesn't ask for passwords by default, anyone in your network can do anything to your blog!. Unless you are in a network where you are the only user, this could be a very bad idea.
Scenario Number 2
A trusted network, but password protected. Could be, for example, a home network with several users, if you don't feel up to tackling Scenario Number 3.
First, you must create at least one "local user with password" with admin rights using PyDS's user tool (Preferences -> User)
Here, we will differentiate between local and remote access. Local access is through the 127.0.0.1 address, and is unrestricted. Remote access will be through the 192.168.1.253 address, and will be password-protected.
Edit ~/.PyDS/etc/PyDSConfig.py (if it doesn't exist, create it) to have something like this:
remotehostname="192.168.1.253"
remoteip="192.168.1.253"
Of course, replacing 192.168.1.253 with your own IP address. Now, you can point your browser to http://192.168.1.253:4334 or whatever your IP is, and you will be asked for the user and password you configured earlier.
Safer than Scenario 1, but still....
Scenario Number 3
A hostile network, for example, Internet, or an insecure office network.Scenario number 2 has a weakness in that the usernames and passwords are transmitted in the clear over the network, and anyone with the wish to read them and some knowledge can do it. The standard mechanism to avoid such a problem in a website is to use HTTPS instead of HTTP. If PyDS used Apache to serve its pages, for example, that would be simple. Ok, maybe not too simple, but doable ;-)
However, PyDS's internal web server has no support for HTTPS as far as I know. So, the solution is to use a reverse https-to-http proxy. If you have no idea what that means, don't worry, you don't need to.
Here's how it works:
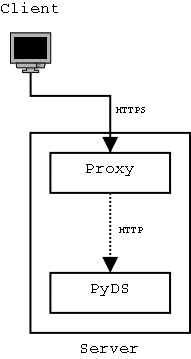
The reverse proxy is a program that receives the client's requests, using the HTTPS protocol, which is secure, and converts them to HTTP, the insecure protocol PyDS uses. Then, it passes those requests to PyDS, and passes PyDS's replies to the client.
Since the Proxy->PyDS connection is internal to the server, it can't be seen by other users on the network.
The reverse proxy I am using is called Pound which is small, simple and light.
Step-By-Step
Download Pound
-
Expand the tarball:
tar xzvf Pound-1.3.tgz -
Compile Pound:
You will need a C compiler, and the development package for OpenSSL. All that should come with your distro, but may not be installed. In Red Hat, assuming the required packages are there, you can compile Pound like this:
./configure --with-ssl=/usr && make
-
Install Pound:
su root -c "make install"
-
Create a SSL certificate:
HTTPS uses certificates to encrypt the data and guarantee the identity of the servers. A "real" certificate costs money. So here you can create what's called a self-signed certificate.
openssl req -new -x509 -days 365 -nodes -out mycert.pem -keyout mycert.pem
While it encrypts just as well as any other, a self-signed certificate doesn't guarantee the identity of the server you connect to. In most cases that should be no problem, except your web browser will complain a bit. Your certificate is the mycert.pem file.
-
Configure Pound:
Assuming your IP address is 192.168.1.253, your PyDS port is 4334 and your certificate file is saved as /home/roberto/mycert.pem, here is the Pound config file, save it as /usr/local/etc/pound.cfg
ListenHTTPS *,443 /home/roberto/mycert.pem UrlGroup ".*" BackEnd 192.168.1.253,4334,1 EndGroup
-
Configure PyDS:
Do it exactly as in the Scenario 2 above.
-
Start Pound:
su root -c /usr/local/sbin/pound
If all went well, now you can point your web browser to https://192.168.1.253 and access PyDS through an encrypted, password-protected link, which is the safest way I can think of right now.
Final Words
This should be enough for PyDS, but don't box yourself in. Anything that can be accessed through HTTP can be made safer by making it use HTTPS. And if it's not supported, you can wrap it using Pound!
Comments for this story are here:
http://www.haloscan.com/com...