Simple Network-To-Network VPN Diagram
This article should explain how to setup and configure a VPN using CIPE. CIPE may not be standard like IPSec, but it sure is a hell of a lot simpler.
CIPE is easy. CIPE is very easy. VPNs created with CIPE work, and they work well. CIPE is your friend. Life is simple with CIPE. Now you feel sleepy. Really sleepy. Keep looking at the pendulum....
To those students I swear there is going to be a spanish version very soon, too!
VPN means Virtual Private Network. As you all should know, virtual means "not real". So, a VPN is "not a real private network".
If that definition is not good enough, here's a better one, which is probably not what you are going to find in other places:
A VPN is emulationg a real network connection using another. For example, you can use the internet connections of two hosts to make it look like you have a direct connection between them.
And if that one is not good enough for you, go here.
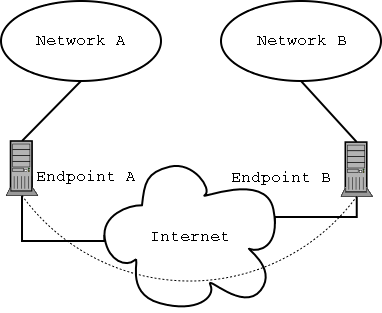
Here's a simple diagram:
That is a VPN connecting Networks A and B, and there is a "virtual link" or tunnel connecting endpoints A and B (the dotted arc).
Of course, since the tunnel is a virtual link, the data is still really transmitted through the real links to the Internet. It's just that applications running on the networks or the endpoints believe they are sending through the virtual link.
Now, in order to make this more useful, the data transferred between the endpoints of the VPN is normally encrypted using some secure algorithm.
What this article tries to do is explain to you how you can create one of these "virtual links" between any two computers, using one specific software package called CIPE.
Normally, when you read about VPNs, you are going to run into IPSec. IPSec is good. But it is also a pain in the ass to setup, at least right now, at least in Linux, and at least for me.
So, from now on, I will pretend IPSec doesn't exist. Forget about it!
In other VPN software, the configurations for each of these is different. On CIPE, they are all exactly the same, except in the cases where you have a network behind one of the endpoints, you need to do some simple routing configuration to allow all hosts to find it.
Well, dear reader, it's a network. You can use a VPN to do what a network does: send data from A to B.
But, since a VPN usually works over a public network, you can for example, use it to get into your office's network from home, or viceversa. Or to connect two offices to each other.
Once you are connected, you can share files, chat, do videoconference, whatever.
In fact, version 1.5 of CIPE can even do ethernet bridging over UDP. In practical terms, that makes it look like the switches in both ends of the VPN are plugged to each other, and all hosts are part of a single LAN... with some very slow patches.
If your distribution doesn't include CIPE, or if it includes an older version (latest right now is 1.5.4), you need to get the latest version of CIPE from here.
Install it following the instructions (the usual ./configure && make && make install should do).
If you are using Red Hat, or other distributions that already include CIPE, make sure you uninstall the distribution's version. Also, on Red Hat, you have to remove the cipcb kernel module that comes with the distribution, because it will conflict with the new version.
You will see that cipe installs /lib/modules/2.4.18-14/misc/cipcb.o but the distro may include something like /lib/modules/2.4.18-14/kernel/drivers/addon/cipe/cipcb.o that you need to remove (or at least move aside ;-)
For each two endpoints you want to connect, you need to create a tunnel. Think of tunnels as the specific virtual links you create between endpoints.
You will have to run, on each endpoint, a cipe process for each tunnel that connects to that endpoint.
For example, in this VPN:
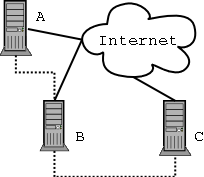
The endpoints A and C have only one tunnel connecting to them, and need to run only one CIPE process, while endpoint B has two tunnels and will have two run two copies of CIPE.
For each copy of CIPE you will run, you will need a separate configuration file, and you will have to call the CIPE process with different options.
Here's an example:
    maxerr=-1
    ipaddr=10.0.0.2
    ptpaddr=10.0.0.1
    me=1.2.3.4:8000
    peer=5.6.7.8:8000
    key=2fe483867df1e7de3827edd26b193590
You will notice that there are options that are related to each other. ipaddr is related to ptpaddr, and me is related to peer.
In the options file in the other endpopint, those options are switched:
    maxerr=-1
    ipaddr=10.0.0.1
    ptpaddr=10.0.0.2
    me=5.6.7.8:8000
    peer=1.2.3.4:8000
    key=2fe483867df1e7de3827edd26b193590
Also, for each tunnel you create, the ipaddr/ptpaddr pair must be different and should not be part of any network the endpoints are connected to. Basically that means they can't be valid Internet IP addresses, and that they must be from private networks other than the ones you use.
For example, if your local networks use 192.168 prefixes, then choose the virtual IP addresses from the 10 or 172.16 prefixes.
And that's it, your VPN tunnel is configured.
Just kill the ciped-cb process. Or do ifconfig cipcb0 down.
If you have more than one tunnel, you need to be careful to kill the right process, or to
bring down the right interface.
If you have a network behind a remote CIPE endpoint and you want it to be reachable, you need to create a route, describing how to get there. Assuming the network behind the remote endpoint is 192.168.1.0/255.255.255.0, and the virtual IP for the remote endpoint is 10.0.0.2, you need to run a command like this when the CIPE link goes up:
route add -net 192.168.1.0 netmask 255.255.255.0 gw 10.0.0.2That can be done editing the script called /etc/cipe/ip-up and adding whatever commands (such as that example above) you want to run when the link goes up.
If you have more than one CIPE tunnel running, just create /etc/cipe/ip-up2 and so on, and in the matching options file add the option ipup=/etc/cipe/ip-up2.